 Table of ContentsDeveloper's Manual
<?php
global $YANA;
$db = $YANA->connect('guestbook');
$db->exportStructure("guestbook.config");
?>Structure files are stored in the XML-like SML-format (see also the article: "The SML file format"). The following is an informal rough overview on the different elements.
The following informal text explains the structure *
DATABASE {
    use_strict    (true | false)
    readonly?     (true | false)
    description?  #string
    include?      (#string | #array)

    TABLES {
        readonly?      (true | false)
        description?   #string
        primary_key    #string
        profile_key?   #string
        foreign_keys?  #array

        CONSTRAINT?    { ... }
        TRIGGER?       { ... }

        CONTENT {
            readonly?     (true | false)
            description?  #string
            type          #string
            length?       #numeric
            precision?    #numeric
            required?     (true | false | AUTO)
            default?      #string
            unique?       (true | false)
            index?        (true | false)

            CONSTRAINT?   { ... }
            TRIGGER?      { ... }

            /* for numeric data types only */
            unsigned?     (true | false)
            zerofill?     (true | false)

            DISPLAY? {
                HIDDEN {
                    new?     (true | false)
                    edit?    (true | false)
                    select?  (true | false)
                    search?  (true | false)
                }
                READONLY {
                    new?   (true | false)
                    edit?  (true | false)
                }
                /* for type "array" only */
                numeric  (true | false)
            }

            /* for type "image" only */
            width?       #numeric
            height?      #numeric
            ratio?       (true | false)
            background?  #array
        }
    }
}

CONSTRAINT {
    select?  #string
    insert?  #string
    update?  #string
    delete?  #string
}

TRIGGER {
	before_insert?  #string
	before_update?  #string
	before_delete?  #string
	after_insert?   #string
	after_update?   #string
	after_delete?   #string
}
* Help: Syntactic elements of the file are printed blue. The possible values and / or data types, which these elements may use are listed behind the elements. Data types are indicated by a rhomb symbol (#). The following data types are used: #string = text, #numeric = number, #array = list type. If multiple values or data types are allowed, they are listed in parentheses, with values separated by a pipe symbol (|). A question mark (?) Indicates that the element is optional.
The following section describes the various elements in detail and provides examples.
Schema files have the extension "*.config" and will be stored in the directory "config/db/". A connection on the basis of a schema file is created by this PHP code: $YANA->connect ("name of the file without extension");
Note that Code templates are available for the editors "ConTEXT" and "PSPad", which may save you a lot of work when creating database schemata. If you use one of these two editors, install these templates first before proceeding.
The following listing shows a scheme with all the elements and all valid values. If there are several possible settings, then these various possibilities are listed, separated by a pipe '|'. Identifier, which can be freely chosen, are highlighted by bold text.
/* The field "USE_STRICT" indicates whether queries
 * are to be checked against the schema at runtime or not.
 */
<USE_STRICT>true|false</USE_STRICT>

/* The field "READONLY" is optional. Default = false
 */
<READONLY>true|false</READONLY>

/* The field "DESCRIPTION" is optional and may contain a description,
 * or the database's name
 */
<DESCRIPTION>Text</DESCRIPTION>

/* The field "INCLUDE" has the same meaning as the PHP-command
 * It imports one or more database schemata in the current file.
 *
 * The file name is given without the file extension.
 * For example: <INCLUDE>user</INCLUDE> to import the database "user"
 * which is described in the file "config/db/user.config".
 */
<INCLUDE>Database schema</INCLUDE>

/* To select multiple files to import, use the following notation:
 */
<INCLUDE>
	<0>1st schema</0>
	<1>2nd schema</1>
	<2>3rd schema</2>
</INCLUDE>

/* Constraints are boolean expressions in PHP notation.
 * They can be linked to a specific SQL action.
 * If the expression evaluates to "false", the query will not be send
 * and an entry will be written to the logs. Otherwise the action will be carried out
 * without intervention.
 *
 * In Constraints you can't call any functions, with one
 * exception: preg_match();
 * In addition, you have access to the following constants:
 * $VALUE      = (for INSERT, UPDATE only) the inserted value
 * $PERMISSION = the security level of the user who triggered the action
 * $OPERATION  = SQL-command that is currently being executed (SELECT, INSERT, ...)
 * $TABLE      = name of target table (in most cases this is the current table)
 * $FIELD      = name of destination column (if any)
 * $ID         = id of current profile (since version 2.8.9)
 *
 * Examples:
 * <SELECT>true</SELECT>
 * <UPDATE>false</UPDATE>
 * <UPDATE>$VALUE > 0 && $VALUE < 500</UPDATE>
 * <INSERT>$PERMISSION > 50</INSERT>
 * <INSERT>preg_match('/^[\w\d-_]*$/i', $VALUE)</INSERT>
 *
 * Constraints are available in YANA since version 2.8 .
 */
<CONSTRAINT>
	<SELECT>PHP-Code</SELECT>
	<INSERT>PHP-Code</INSERT>
	<UPDATE>PHP-Code</UPDATE>
	<DELETE>PHP-Code</DELETE>
</CONSTRAINT>

/* Trigger are miniature programs in PHP syntax.
 * They are bound to a particular SQL action and are automatically executed
 *before o r after the SQL statement is executed.
 *
 * THESE triggers are different from those triggers in a database.
 * 1) PHP can be used,
 * 2) will work with the same code regardless of the DBMS, but:
 * 3) no direct access to the database.
 *
 * These triggers are particularly suitable for logging and modify input data.
 *
 * In addition, you have access to the following constants:
 * $VALUE      = (for INSERT, UPDATE only) the inserted value
 * $PERMISSION = the security level of the user who triggered the action
 * $OPERATION  = SQL command (BEFORE_INSERT, AFTER_UPDATE, ...)
 * $TABLE      = name of target table (in most cases this is the current table)
 * $FIELD      = name of destination column (if any)
 * $ID         = id of current profile (since version 2.8.9)
 *
 * Examples:
 * <BEFORE_INSERT>$VALUE = md5($VALUE);true</BEFORE_INSERT>
 * <AFTER_DELETE>if($VALUE){print 'Successfully deleted.';}else{print 'Error.';}</AFTER_DELETE>
 */
<TRIGGER>
	<BEFORE_INSERT>PHP-Code</BEFORE_INSERT>
	<BEFORE_UPDATE>PHP-Code</BEFORE_UPDATE>
	<BEFORE_DELETE>PHP-Code</BEFORE_DELETE>
	<AFTER_INSERT>PHP-Code</AFTER_INSERT>
	<AFTER_UPDATE>PHP-Code</AFTER_UPDATE>
	<AFTER_DELETE>PHP-Code</AFTER_DELETE>
</TRIGGER>

/* As you may have already suspected: the option READONLY=true
 * and the constraint UPDATE=false both have the same effect.
 */

/* Here is the definition of the tables.
 */
<TABLES>
	<Name of table>
		<READONLY>true|false</READONLY>
		<DESCRIPTION>Label of table</DESCRIPTION>

		<CONSTRAINT>
			<SELECT>PHP-Code</SELECT>
			<INSERT>PHP-Code</INSERT>
			<UPDATE>PHP-Code</UPDATE>
			<DELETE>PHP-Code</DELETE>
		</CONSTRAINT>
		<TRIGGER>
			<BEFORE_INSERT>PHP-Code</BEFORE_INSERT>
			<BEFORE_UPDATE>PHP-Code</BEFORE_UPDATE>
			<BEFORE_DELETE>PHP-Code</BEFORE_DELETE>
			<AFTER_INSERT>PHP-Code</AFTER_INSERT>
			<AFTER_UPDATE>PHP-Code</AFTER_UPDATE>
			<AFTER_DELETE>PHP-Code</AFTER_DELETE>
		</TRIGGER>

/* The field "PRIMARY_KEY" holds the name of the column, which is the primary key.
   (See literature under the keyword: "primary key constraint")
 */
		<PRIMARY_KEY>Name of column</PRIMARY_KEY>

/* The field "PROFILE_KEY" is the name of a column (if any), which contains the profile key.

   The purpose:
   You can assign the records of a table to a profile.
   If you do so, a user sees only the records of the selected profile.

   Creating a "profile key constraint":
   1)  Add a column of the type "profile" to the table
   2) set the property "required" for this column to "AUTO"
   3) Set the table's property "profile_key " to the name of the column

   (This is a special case of a "compound primary key" - this is a "primary key constraint".
   A "special case" because the key is a virtual key.
   This means that the technical handling for the user is done completely transparent.
   You can remove this constraint afterwards and the primary key will remain
   valid. That also means that you may subsequently add or remove this constraint,
   without having to change the source code of your plug-in. Checking and resolving of
   profile keys is done on the level of the database layer. This also means, when looking at the security
   of your application it is practically impossible to circumvent a "profile key" constraint.
     This feature was introduced in version 2.9.)
 */
		<PROFILE_KEY>Name of column</PROFILE_KEY>

/* The field "FOREIGN_KEYS" may hold a list of foreign keys.
   (See literature under the keyword: "foreign key constraint")
 */
		<FOREIGN_KEYS>
			<name of column>name of target table</name of column>
			<another column>another target table</another column>
		</FOREIGN_KEYS>

/* Here is the definition of table columns.
 */
		<CONTENT>
			<Name of column>
				<READONLY>true|false</READONLY>

				<CONSTRAINT>
					<SELECT>PHP-Code</SELECT>
					<UPDATE>PHP-Code</UPDATE>
				</CONSTRAINT>
				<TRIGGER>
					<BEFORE_UPDATE>PHP-Code</BEFORE_UPDATE>
					<AFTER_UPDATE>PHP-Code</AFTER_UPDATE>
				</TRIGGER>

/* The field "DESCRIPTION" is a label for this column.
 * You can also use %TOKEN% that you define in your program,
 * or in a language file, to be able to provide the label in multiple
 * different languages.
 */
				<DESCRIPTION>Label of column</DESCRIPTION>

/* The primitive, scalar data types integer, float and string correspond to their
 * equivalent in PHP. In addition, other useful data types have been introduced.
 *
 * mail    = checks automatically, whether the value is a valid email address.
 * ip      = checks automatically, whether the value is a valid IP address.
 * text    = for input from text area fields, provides additional tests
 *           to protect against flooding.
 * select  = enumeration data type, which elements are defined in the "DEFAULT",
 *           see below.
 * array   = can be used to store PHP arrays. When reading the value
 *           from the database, they are automatically converted to an array.
 * image   = is used to store graphics. Handles file uploads,
 *           testing and conversion of the graphic and automatically generates thumbnails.
 * file    = this type is used to save files ("binary large objects").
 *           For reasons of better performance the files remain in the file system
 *           after the upload. In order to save disk space, they will automatically be GZip-compressed.
 *           The database will only store the file name. When you read the column
 *           the name and location of the compressed file will be returned as a result.
 */
				<TYPE>integer|float|string|text|url|ip|mail|time|select|array</TYPE>

				<LENGTH>positive integer</LENGTH>

/* For data type "float" you may use "PRECISION" to determine the number of decimal places.
 */
				<PRECISION>positive integer</PRECISION>

/* The field "REQUIRED" selects, whether a field is NULLABLE or not.
 */
				<REQUIRED>true|false</REQUIRED>

/* The field "DEFAULT" sets a value that is automatically used when,
 * a data set is created and no other value is given.
 */
				<DEFAULT>a Default value</DEFAULT>

/* The field "UNIQUE" is either "true" or "false", where "false"
 * is the default value. If UNIQUE=true each value in this column may not occur more than
 * 1 time. This means, each value is unique ( thus the name).
 * Use this setting to define more keys in addition to the
 * key primary key.
 */
				<UNIQUE>true|false</UNIQUE>

/* The field "INDEX" is either "true" or "false", where "false"
 * is the default value. If INDEX=true a sorted list of all values of this column
 * are stored, what may increase the speed of sorting and searching for values
 * in the column.
 */
				<INDEX>true|false</INDEX>

/*
 * Instructions GUI and SDK can be filled in the field "DISPLAY".
 * There are two settings: "HIDDEN" and "READONLY".
 * Where "READONLY" means that this column is not displayed for editing.
 * As the name implies, "HIDDEN" means the columns is not to be displayed
 * at all.
 * There are separate settings for each of the queries: "NEW", "EDIT", "VIEW" and "SEARCH".
 * The properties can be set globally or individually for each action.
 */

/* First, the variant with global settings
 */
				<DISPLAY>
					<HIDDEN>true|false</HIDDEN>
					<READONLY>true|false</READONLY>
				</DISPLAY>

/* Now, the variant with local settings for each option
 */
				<DISPLAY>
					<HIDDEN>
						<NEW>true|false</NEW>
						<EDIT>true|false</EDIT>
						<SELECT>true|false</SELECT>
						<SEARCH>true|false</SEARCH>
					</HIDDEN>
					<READONLY>
						<NEW>true|false</NEW>
						<EDIT>true|false</EDIT>
					</READONLY>
				</DISPLAY>

/*
 * For type "array" the property "display" may also carry the flag  "NUMERIC"
 * to express that this is a numeric array.
 * This will hide the array keys in the graphical user interface of the program
 * and assign numeric keys to new entries automatically.
 *
 */
				<DISPLAY>
					<NUMERIC>true|false</NUMERIC>
				</DISPLAY>

			</Name of column>


/*
 * For the data types integer, ip and timethe field "REQUIRED" may have the value "AUTO"
 * to be set. This means that the value is automatically generated.
 * For time    = current date as the Unix Time-Stamp
 * For ip      = the IP of the visitor
 * For integer = auto-increment or the value of a sequence
 */
			<name of column>
				<TYPE>integer|ip|time</TYPE>
				<REQUIRED>AUTO</REQUIRED>
			</name of column>

/*
 * For the data type select a enumerated list of valid values can be given.
 *
 * The semantics can be relatively easy to remembered:
 * + The GUI displays columns of type "select" in forms as select-fields.
 * + The presentation in the scheme also recalls a select field in HTML.
 */
			<name of column>
				<TYPE>select</TYPE>
				<DEFAULT>
					<default value>label</default value>
					<option 1>label 1</option 1>
					<option 2>label 2</option 2>
				</DEFAULT>
			</name of column>

/*
 * For the data type image the maximum file size, width and height of the graphic
 * can be specified. If the image is too small or too large, it will automatically
 * be resized. The value "ratio" is to indicate, whether
 * the ratio of width to height is to sustain (true) or not (false).
 * If "ratio" is set to "true", resizing the image might cause a border around the image.
 * Therefore, a background color can be specified.
 * This background color fills the unused area around the graphics.
 *
 * The form generator can (if it is used) automatically create an upload field
 * to transfer graphic files to the server.
 * For each upload, a thumbnail of size 75x75px is created automatically.
 * The form generator automatically displays the thumbnail when calling the record
 * and a link to show the full graphic.
 *
 * For reasons of performance graphics are not stored as "blobs" in the database,
 * but in a non-public directory in the file system.
 * The database stores only the path to the graphic file.
 * When deleting the record (using the database API of the framework),
 * the graphic and thumbnail associated with the data set are deleted as well.
 */
			<name of column>
				<TYPE>image</TYPE>
				<LENGTH>max. upload size in byte</LENGTH>
				<WIDTH>width in pixel</WIDTH>
				<HEIGHT>height in pixel</HEIGHT>
				<RATIO>true|false</RATIO>
				<BACKGROUND>
					<0>number 0-255 (red)</0>
					<1>number 0-255 (green)</1>
					<2>number 0-255 (blue)</2>
				</BACKGROUND>
			</name of column>

/*
 * For numeric data types integer and float two
 * additional properties may be defined.
 *
 * unsigned: the number is stored unsigned
 * zerofill: when displaying the number free places are filled by '0'
 *
 * Note: The property "zerofill" works correctly only if the property
 * "length" has a fixed value.
 */
			<name of column>
				<TYPE>integer|float</TYPE>
				<UNSIGNED>true|false</UNSIGNED>
				<ZEROFILL>true|false</ZEROFILL>
				<LENGTH>positive integer</LENGTH>
			</name of column>


		</CONTENT>
	</name of table>

/* Further tables may follow here.
 */

</TABLES>
Now see this very simple example:
/* The head is usually always the same: */

<USE_STRICT>true</USE_STRICT>
<READONLY>false</READONLY>

/* This is followed by the definition of the tables in the database */

<TABLES>
	/* The table 'foo' */
	<foo>
		/* Each table must have a primary key */
		<PRIMARY_KEY>foo_id</PRIMARY_KEY>
		/* Now the columns */
		<CONTENT>
			/* First, the primary key */
			<foo_id>
				<TYPE>integer</TYPE>
				<LENGTH>8</LENGTH>
			/* REQUIRED=auto generates an "autoincrement" column */
				<REQUIRED>auto</REQUIRED>
			/* HIDDEN=true makes the field invisible to visitors */
				<DISPLAY>
					<HIDDEN>true</HIDDEN>
				</DISPLAY>
			</foo_id>
			/* Now the remaining fields */
			<foo_title>
				<TYPE>string</TYPE>
				<LENGTH>128</LENGTH>
				<REQUIRED>true</REQUIRED>
				<DESCRIPTION>Title</DESCRIPTION>
			</foo_title>
			<foo_text>
				<TYPE>text</TYPE>
				<REQUIRED>false</REQUIRED>
				<DESCRIPTION>Text</DESCRIPTION>
			</foo_text>
		</CONTENT>
	</foo>
	/* a second table */
	<bar>
		<PRIMARY_KEY>bar_id</PRIMARY_KEY>
		<CONTENT>
			<bar_id>
				<TYPE>string</TYPE>
				<LENGTH>32</LENGTH>
				<REQUIRED>AUTO</REQUIRED>
				<DISPLAY>
					<HIDDEN>true</HIDDEN>
				</DISPLAY>
			</bar_id>
			<bar_value>
				<TYPE>string</TYPE>
				<LENGTH>128</LENGTH>
				<REQUIRED>true</REQUIRED>
				<DESCRIPTION>Value</DESCRIPTION>
			</bar_value>
			<bar_time>
				<TYPE>time</TYPE>
				<REQUIRED>auto</REQUIRED>
				<DESCRIPTION>Time</DESCRIPTION>
			</bar_time>
		</CONTENT>
	</bar>
</TABLES>
The following is an example of a more complex database. Portrayed is the data structure of the guestbook application:
<USE_STRICT>true</USE_STRICT>
<READONLY>false</READONLY>
<TABLES>
	<guestbook>
		<PRIMARY_KEY>guestbook_id</PRIMARY_KEY>
		<CONTENT>
			<guestbook_id>
				<TYPE>integer</TYPE>
				<LENGTH>5</LENGTH>
				<DESCRIPTION>Id (PK)</DESCRIPTION>
				<DISPLAY>
					<HIDDEN>true</HIDDEN>
				</DISPLAY>
			</guestbook_id>
			<profile_id>
				<TYPE>string</TYPE>
				<LENGTH>128</LENGTH>
				<REQUIRED>AUTO</REQUIRED>
				<DESCRIPTION>Id (FK)</DESCRIPTION>
				<DISPLAY>
					<HIDDEN>true</HIDDEN>
				</DISPLAY>
			</profile_id>
			<guestbook_ip>
				<TYPE>ip</TYPE>
				<LENGTH>15</LENGTH>
				<REQUIRED>AUTO</REQUIRED>
				<DISPLAY>
					<HIDDEN>true</HIDDEN>
				</DISPLAY>
			</guestbook_ip>
			<guestbook_name>
				<TYPE>string</TYPE>
				<LENGTH>128</LENGTH>
				<REQUIRED>true</REQUIRED>
				<DESCRIPTION>Name</DESCRIPTION>
			</guestbook_name>
			<guestbook_message>
				<TYPE>text</TYPE>
				<LENGTH>3000</LENGTH>
				<REQUIRED>true</REQUIRED>
				<DESCRIPTION>Text</DESCRIPTION>
			</guestbook_message>
			<guestbook_mail>
				<TYPE>mail</TYPE>
				<LENGTH>255</LENGTH>
				<DESCRIPTION>Mail</DESCRIPTION>
			</guestbook_mail>
			<guestbook_homepage>
				<TYPE>string</TYPE>
				<LENGTH>512</LENGTH>
				<DESCRIPTION>Homepage</DESCRIPTION>
			</guestbook_homepage>
			<guestbook_messenger>
				<DESCRIPTION>Messenger</DESCRIPTION>
				<TYPE>string</TYPE>
				<LENGTH>255</LENGTH>
			</guestbook_messenger>
			<guestbook_msgtyp>
				<DESCRIPTION>Typ</DESCRIPTION>
				<TYPE>select</TYPE>
				<LENGTH>5</LENGTH>
				<DEFAULT>
					<icq>ICQ</icq>
					<aol>AOL</aol>
					<yahoo>Yahoo!</yahoo>
					<msn>MSN</msn>
				</DEFAULT>
			</guestbook_msgtyp>
			<guestbook_opinion>
				<TYPE>select</TYPE>
				<LENGTH>1</LENGTH>
				<CONSTRAINT>
					<INSERT>$VALUE >= 0 && $VALUE <= 5</INSERT>
					<UPDATE>$VALUE >= 0 && $VALUE <= 5</UPDATE>
				</CONSTRAINT>
				<DEFAULT>
					<0>unentschlossen</0>
					<1>sehr gut</1>
					<2>gut</2>
					<3>befriedigend</3>
					<4>ausreichend</4>
					<5>ungenügend</5>
				</DEFAULT>
				<DESCRIPTION>Meinung</DESCRIPTION>
			</guestbook_opinion>
			<guestbook_date>
				<TYPE>time</TYPE>
				<REQUIRED>AUTO</REQUIRED>
				<DESCRIPTION>Datum/Zeit</DESCRIPTION>
				<DISPLAY>
					<HIDDEN>
						<NEW>true</NEW>
                    			</HIDDEN>
				</DISPLAY>
			</guestbook_date>
			<guestbook_comment>
				<TYPE>text</TYPE>
				<LENGTH>1024</LENGTH>
				<REQUIRED>false</REQUIRED>
				<DESCRIPTION>Kommentar</DESCRIPTION>
				<DISPLAY>
					<READONLY>
						<EDIT>true</EDIT>
					</READONLY>
				</DISPLAY>
			</guestbook_comment>
			<guestbook_is_registered>
				<TYPE>integer</TYPE>
				<LENGTH>1</LENGTH>
				<REQUIRED>AUTO</REQUIRED>
				<DEFAULT>0</DEFAULT>
				<DISPLAY>
					<HIDDEN>true</HIDDEN>
				</DISPLAY>
			</guestbook_is_registered>
		</CONTENT>
	</guestbook>
</TABLES>
The following code creates two tables "foo" and "bar". The table "bar" contains a foreign-key reference to table "foo".
<TABLES>

	<foo>

		Primary key constraint:
		<PRIMARY_KEY>foo_id</PRIMARY_KEY>

		<CONTENT>
			<foo_id>
				<TYPE>integer</TYPE>
				<DESCRIPTION>Primary key of table foo</DESCRIPTION>
				<REQUIRED>AUTO</REQUIRED>
			</foo_id>
			<foo_name>
				<TYPE>string</TYPE>
				<DESCRIPTION>A column containing a name or title</DESCRIPTION>
			</foo_name>
		</CONTENT>
	</foo>

	<bar>

		Primary key constraint:
		<PRIMARY_KEY>bar_id</PRIMARY_KEY>

		Foreign key constraint:
		<FOREIGN_KEYS>

			foo_id = column name
			foo = table name

			<foo_id>foo</foo_id>

		</FOREIGN_KEYS>

		<CONTENT>
			<bar_id>
				<TYPE>integer</TYPE>
				<REQUIRED>AUTO</REQUIRED>
				<DESCRIPTION>Primary key of table bar</DESCRIPTION>
			</bar_id>
			<foo_id>
				<TYPE>select</TYPE>
				<REQUIRED>true</REQUIRED>
				<DESCRIPTION>Foreign-key on table foo, presented as select-box</DESCRIPTION>
				<DEFAULT>

					foo_id = column, which is to be stored in the database
					foo_name = column, visible in the browser

					<foo_id>foo_name</foo_id>

				</DEFAULT>
			</foo_id>
		</CONTENT>
	</bar>
</TABLES>
The function "create" (see section on templates) calls the form generator. The form generator is capable of using the information in the database schema to generate forms to view, search, create, edit, and delete records in the database. Necessary queries are carried ot automatically. In database schemata, the tag "DISPLAY" is used to control the behavior of the form generator. This tag allows to hide individual columns of a table, depending on the type of the current form.
The form generator shows table columns depending on the data type in different ways. The following is a comparison of data types and screenshots showing the respective representation in the GUI.
| Type of column | Representation in the GUI | Description |
|---|---|---|
| integer, float, string |  |
Strings and numbers are displayed as input fields when edited. If the column is editable, the content is displayed as text. |
| boolean |  |
Entries of type "boolean" use a checkbox. When viewing the column, a graphic indicates the state of the field. |
| text | 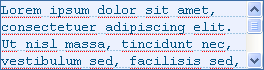 |
Multi-line texts use textarea fields for editing. If the column is not editable, it's contents are shown as text. If a text is too long, scrollbars are shown (CSS: "overflow: auto"). |
| url, ip |  |
The data type "ip" offers the possibility to automatically store the IP address of the visitor. IP addresses are checked for syntactic validity. As a rule, columns of this type should not be editable. If they are, they use an input box for editing. The data type "url" is displayed just like a column of type "string", with the slight difference that every input is checked to be a syntactically correct URL. |
 |
This data type also uses an input box for editing. Inputs are checked for syntactical validity. Values of type "mail" are encoded when shown in the browser, to make data theft more difficult. This applies to all displayed mail addresses. The implementation is done automatically in the presentation layer of the framework, manual intervention is therefore unnecessary. | |
| select | 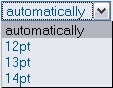 |
The data type "select" is an enumeration type. When editing such column, a select box is shown. The contents of the box may be predefined in the database schema (using the property "Default"). If the field is a foreign key (i.e., if this column has a foreign key constraint), the menu will automatically be filled using the entries of the linked table. You may also specify the columns the labels and values are taken from. |
| set |  |
The data type "set" is another variant of an enumeration type, which permits the use of multiple values (unlike "select", which only allows a single value). When editing such column, a list of check boxes is presented. Values and labels of the boxes can set in the database schema (using the property "Default"). |
| time |  |
When editing columns of type "time", select boxes are shown to ease the input of dates. Entries of type "time" will be automatically saved as a time stamp and presented in the GUI as a date. The format of presentation can be chosen in the administration menu and adapt to the chosen language settings automatically. Using the framework, dates are automatically synchronized with the visitor's time zone and its respective locale settings. |
| array | 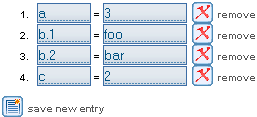 |
Entries of type "array" may be multidimensional arrays. When editing these, contents are presented as pairs of keys and values. By clicking "remove" a value is deleted, click on "add new entry" to append a new value. Values are presented as multidimensional foldable tree menus. When touching a key with the mouse, the list of all entries associated with this key, is shown. |
| array (numeric) | 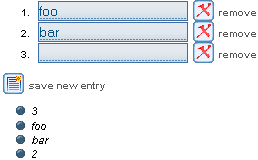 |
Numerical lists are defined using the property "display.numeric". They differ from "normal" arrays because they present no fields to input individual keys. Instead keys are chosen automatically when creating a new record. Values are presented as list elements. |
| image |  |
Columns of the data type "image" are presented as a thumbnail image plus an upload field to insert or replace the stored graphic. When clicking the thumbnail the complete graphic will be shown in a new window. The graphics file is automatically checked and converted during upload. You may specify settings in the database schema to control this conversion, such as the desired image size. |
| file |  |
The data type "file" is used to save files ("binary large objects"). When editing, it will present an upload field to upload a new file, and a button to download the current one. The files remain in the file system (not in the database) for better performance. In order to save disk space, they will automatically be GZip-compressed. This compression also ensures that files stores on the server are not executable and a potential attacker can't misuse such upload fields to store malicious code on the server. When you download the file will be unpacked automatically, so the user no disadvantages from the experiences compression and decompression not installed. To have a faster download, the file is automatically send as compressed data stream, if the user's browser supports this feature (most current browser do). The browser unpacks the file independently. A manual intervention is not necessary. The framework automatically takes care of this feature. |
Comparison of data types and their representation by the form generator
The downloading of files or opening of graphics for columns of data type "image" or "file", is implemented in the function "download_file", which is located in the plug-in "default_library". This usually happens automatically.
For security reasons, access to this action is by default limited to users of the user group "admin". This is the user group with the highest level of security. If you want to permit access to these data to users with a lower level of security as well, you need to reduce security restrictions for this action.
To do this, edit the file "plugins/default_library.config" in a text editor of your choice. Look for the following section.
<DOWNLOAD_FILE>
    <TYPE>primary</TYPE>
    <MODE>1</MODE>
    <TEMPLATE>NULL</TEMPLATE>
    <PERMISSION>100</PERMISSION>
</DOWNLOAD_FILE>
The security level is represented as a number between 0 and 100, with 100 representing the group "admin" and 0 the group "guest". Change the value "100" to a number that seems reasonable to you.
Some proposals are in the following table:
| User group | Security level |
|---|---|
| guest | 0 |
| registered user (registered) | 1 |
| moderator (mod) | 30 |
| owner | 75 |
| administrator (admin) | 100 |
Comparison of user groups and levels of security
In this example, the value is set to "1".
<DOWNLOAD_FILE>
    <TYPE>primary</TYPE>
    <MODE>1</MODE>
    <TEMPLATE>NULL</TEMPLATE>
    <PERMISSION>1</PERMISSION>
</DOWNLOAD_FILE>
Save and close the file.
In order for the changes to take effect, you have to go to the administration menu of the Yana framework and refresh the plug-in cache.
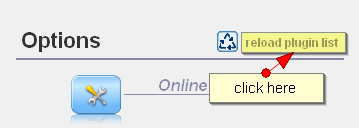
After clicking the button, the settings take effect immediately.
 Thomas Meyer, www.yanaframework.net
 Working with databases