 Table of ContentsDeveloper's Manual
Databases are represented in the Yana Framework by so-called "database schemes". These schemes are descriptions of the structure of a database. In other words, the tables, their columns, indexes and constraints. This information is stored in files. These "database structure files" are stored in the directory "config/db" of the framework.
In addition - and this distinguishes the Yana Framework fundamentally from other frameworks - these files also contain a description of the semantics of a database. In other words, the context in which a column is visible or invisible, how the information is to be presented to the user, or what label a column should have.
To create a database for the Yana Framework you don't need an expensive modeling tool, and no SQL knowledge, but merely a simple text editor.
To create a new database first open a blank text file in PSPad. Set the syntax highlighting to "Yana Framework" (if you haven't installed the syntax highlighting files and code templates yet, see the chapter "editors for the Yana Framework" ).
The new database will contain a table "blog", which will store the items of a web log. Each entry will be contain an unique ID (primary key), the author's name, date of creation, a title and text.
There are code templates to help you with the preparation of the database. Enter the text "db" and press the buttons <CTRL> + <SPACE> simultaneously. This will show a list of code templates. This list has two columns: the left in bold is a "shortcut" that you can enter directly (as in this case "db") and on the right a description of the templates.
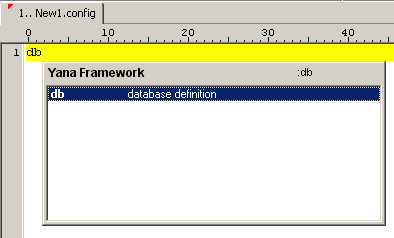
Figure: Insert code templates
Choose the template "database definition" and press <ENTER>. The document should now look like the following figure:
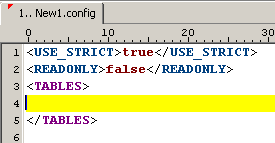
Figure: Database body
Now insert a table. To do this, press <STRG> + <SPACE> and select the "table definition" (shortcut "tbl"). Rename the table by selecting the table name as the title of the opening and closing tags. In this tutorial the table will be named "blog".
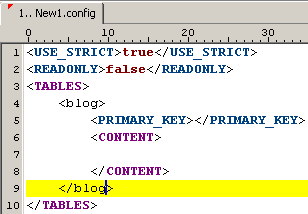
Figure: Table "blog"
Add a primary key to the table. A table can always have only 1 primary key. The primary key must always consist of exactly one column of type "integer", "float" or "string". Compound primary keys are not supported.
To add a column, click inside the container "CONTENT" of the table, and insert the code template "primary key" (shortcut "id"). Name the column "blog_id".
To define that the column "blog_id" is a primary key, you must specify the name of the column as the "PRIMARY_KEY".
If you have completed these steps successfully, your file should look like the following:
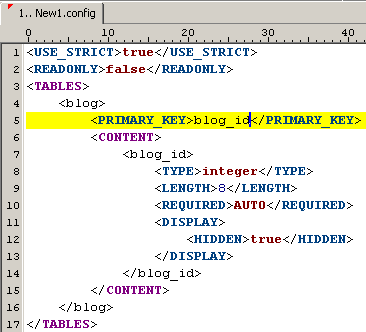
Figure: Inserting the primary key
Now add a column of type "string" for the title and a column of type "text" for the text of the entry. A column of type "time" for the date of creation, and another column of type "string" for the name of the author.
The source code should now look like this:
<USE_STRICT>true</USE_STRICT>
<READONLY>false</READONLY>
<TABLES>
	<blog>
		<PRIMARY_KEY>blog_id</PRIMARY_KEY>
		<CONTENT>
			<blog_id>
				<TYPE>integer</TYPE>
				<LENGTH>8</LENGTH>
				<REQUIRED>AUTO</REQUIRED>
				<DISPLAY>
					<HIDDEN>true</HIDDEN>
				</DISPLAY>
			</blog_id>
			<blog_title>
				<TYPE>string</TYPE>
				<LENGTH>255</LENGTH>
				<DESCRIPTION>Title</DESCRIPTION>
			</blog_title>
			<blog_text>
				<TYPE>text</TYPE>
				<LENGTH>3000</LENGTH>
				<REQUIRED>true</REQUIRED>
				<DESCRIPTION>Text</DESCRIPTION>
			</blog_text>
			<blog_created>
				<TYPE>time</TYPE>
				<REQUIRED>AUTO</REQUIRED>
				<DESCRIPTION>Date</DESCRIPTION>
			</blog_created>
			<blog_author>
				<TYPE>string</TYPE>
				<LENGTH>255</LENGTH>
				<DESCRIPTION>Author</DESCRIPTION>
			</blog_author>
		</CONTENT>
	</blog>
</TABLES>
Compare the source code above with your result.
The property" TYPE " is the data type of the column, " DESCRIPTION " is a label of the column to show to the user. The property "LENGTH" indicates the maximum length for the contents of the field. For columns of type "string" (in MySQL this is interpreted as "VARCHAR"), this is the maximum length in characters.
The property " REQUIRED " indicates whether a value is mandatory. This property can take three values: "true", "false" and "AUTO". Where "true" = is a required field, "false" = an optional field and "AUTO" = the value is generated automatically, if the user does not specify a value.
Or in other words: the "REQUIRED" indicates whether a column is "nullable". If "REQUIRED" is set to "true", the column will be set "NOT NULL" in MySQL and vice versa.
If you set the value to "AUTO" on a column of type "integer" you get an auto-incremented column in MySQL. The column "blog_id" in the example above uses auto-increment. (In MSSQL and DB2 this is realized as "identity", as "sequence" in PostgreSQL and as trigger in Oracle). The value "AUTO" on a column of type "time" causes the current time to be inserted as value.
A property, which has not been used yet in the example above is " DEFAULT ". This can be used to set a "default value", which will automatically be used if there is no other input given.
Finally, the property " DISPLAY ". This property has no equivalent in SQL. It controls the presentation of the column in the Framework. It identifies all forms in which the column is: visible, visible and editable, or not visible at all. This distinguishes between forms to: view, search, create and edit records in the table.
The above table will now be completed with some more information.
For example, you should specify that the columns "blog_title" (title) and "blog_text" (text) always need to be filled. To do this, add the property "REQUIRED" with the value "true" (shortcut "req").
The date of creation is inserted automatically. It should therefore not be visible when writing the entry for the user and not be edited afterwards. For the column "blog_created" (date) add a property "DISPLAY" (shortcut "disp"). Set the values "HIDDEN.NEW" and "READONLY.EDIT" to "true". Set all other values to "false".
You can, of course, store several blogs in a table. To do this you need an extra column, which identifies which blog an entry belongs to. This can be useful, for example, if you have several web pages per site and want to have a blog for each of them.
The functionality to distiguish between all these different blogs, and the assignment to individual web pages don't need to be programmed manually. The framework has prepared a template for this purpose.
First add a new column of type "profile" (shortcut "pid"). The column should be called "profile_id". Then enter a new line after the property "PRIMARY_KEY", add the property "PROFILE_KEY" (shortcut "prf"), and set the value of this property to "profile_id".
Compare your results with the following source code.
<USE_STRICT>true</USE_STRICT>
<READONLY>false</READONLY>
<TABLES>
	<blog>
		<PRIMARY_KEY>blog_id</PRIMARY_KEY>
		<PROFILE_KEY>profile_id</PROFILE_KEY>
		<CONTENT>
			<blog_id>
				<TYPE>integer</TYPE>
				<LENGTH>8</LENGTH>
				<REQUIRED>AUTO</REQUIRED>
				<DISPLAY>
					<HIDDEN>true</HIDDEN>
				</DISPLAY>
			</blog_id>
			<blog_title>
				<TYPE>string</TYPE>
				<LENGTH>255</LENGTH>
				<DESCRIPTION>Title</DESCRIPTION>
				<REQUIRED>true</REQUIRED>
			</blog_title>
			<blog_text>
				<TYPE>text</TYPE>
				<LENGTH>3000</LENGTH>
				<REQUIRED>true</REQUIRED>
				<DESCRIPTION>Text</DESCRIPTION>
				<REQUIRED>true</REQUIRED>
			</blog_text>
			<blog_created>
				<TYPE>time</TYPE>
				<REQUIRED>AUTO</REQUIRED>
				<DESCRIPTION>Date</DESCRIPTION>
				<DISPLAY>
  					<HIDDEN>
  						<NEW>true</NEW>
  					</HIDDEN>
  					<READONLY>
  						<EDIT>true</EDIT>
  					</READONLY>
  				</DISPLAY>
			</blog_created>
			<blog_author>
				<TYPE>string</TYPE>
				<LENGTH>255</LENGTH>
				<DESCRIPTION>Author</DESCRIPTION>
			</blog_author>
			<profile_id>
				<TYPE>profile</TYPE>
				<LENGTH>128</LENGTH>
				<REQUIRED>AUTO</REQUIRED>
				<DISPLAY>
					<HIDDEN>true</HIDDEN>
				</DISPLAY>
			</profile_id>
		</CONTENT>
	</blog>
</TABLES>
This ends the creation of the database Save your changes in the file "blog.config" and close the program.
If you would like a more detailed view on the issues discussed in this section, you will find instructions in the following articles:
The following section will look at the creation of the program codes.
 Thomas Meyer, www.yanaframework.net
 Chapter 1: Preparation